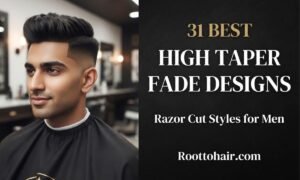

Razor-cut high taper fades have become one of the sharpest, most requested looks in men’s grooming. Their clean lines and gradual shortening at the temples and neckline give any haircut a polished finish. In this guide, you’ll find 31 designs to match your style.
A high taper fade starts blending close to the temple, leaving more length on top and sides for contrast. Adding a razor-cut edge creates crisp definition that keeps the shape looking fresh and intentional. The result works equally well for short crops, textured tops, and longer styles.
Whether you prefer a classic cut, a bold design, or something subtle for the office, there’s a high taper fade here for you. Each style includes tips on who it suits and how to ask your barber for it. Scroll on to find your next haircut.
What Is a High Taper Fade With Design?
A high taper fade with design is a haircut where the sides and back gradually fade from longer hair to very short, starting high up near the temples. A custom pattern, such as lines, shapes, or a part, is then shaved into the fade for a bold, personalized finish.
The “high” placement of the fade creates a sharp contrast between the faded sides and the longer hair on top, giving the cut a clean, dramatic look. The design element adds an artistic detail that makes the style stand out from a standard taper fade.
This style suits men who want a modern, eye-catching haircut with a touch of individuality. It works well with short, medium, or textured hair on top, and the design can be as subtle or as bold as you like.
31 High Taper Fade Design Ideas
Simple Designs
These ten designs are clean, easy to maintain and forgiving as the hair grows.
1. Single Razor Line Above the Taper
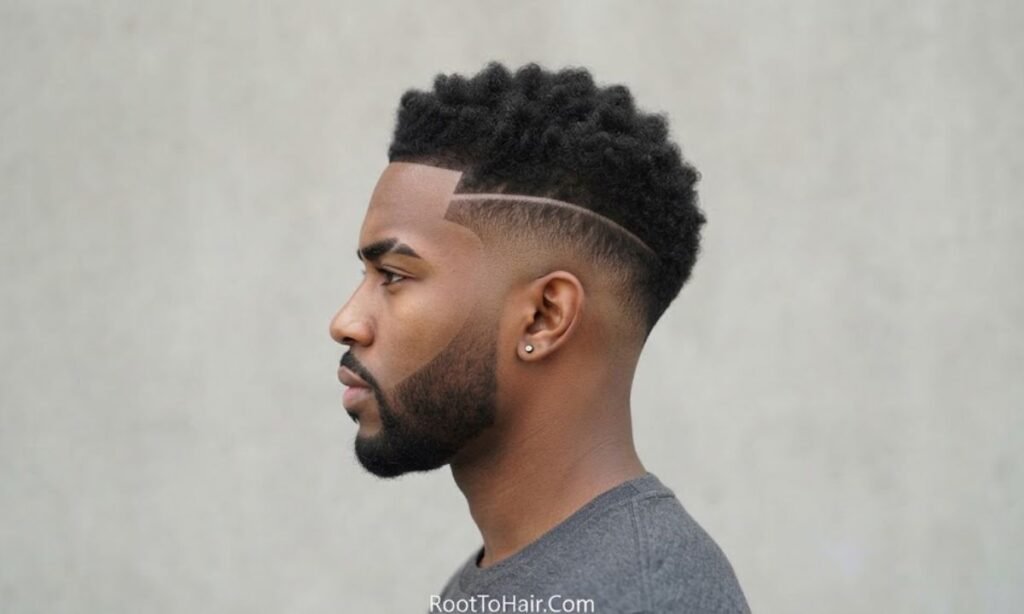
Short Description: One crisp, continuous line shaved just above where the taper begins, following the curve of the head.
Design Placement: Side of the head, a short distance above the temple taper and running toward the back.
Best Match: Works with most hair types and lengths on top. It suits oval and square faces and anyone who wants a subtle upgrade to a plain taper.
What to Tell Your Barber: “Give me a high taper and add one thin, sharp line a finger-width above it, following the natural curve.”
Styling & Maintenance: Because the line is the only detail, the top can be styled any way you like. A fresh edge-up every couple of weeks keeps the line crisp.
Best Tip: Ask for the line to be slightly softer at the ends so it blends instead of stopping abruptly.
2. Double Parallel Razor Lines
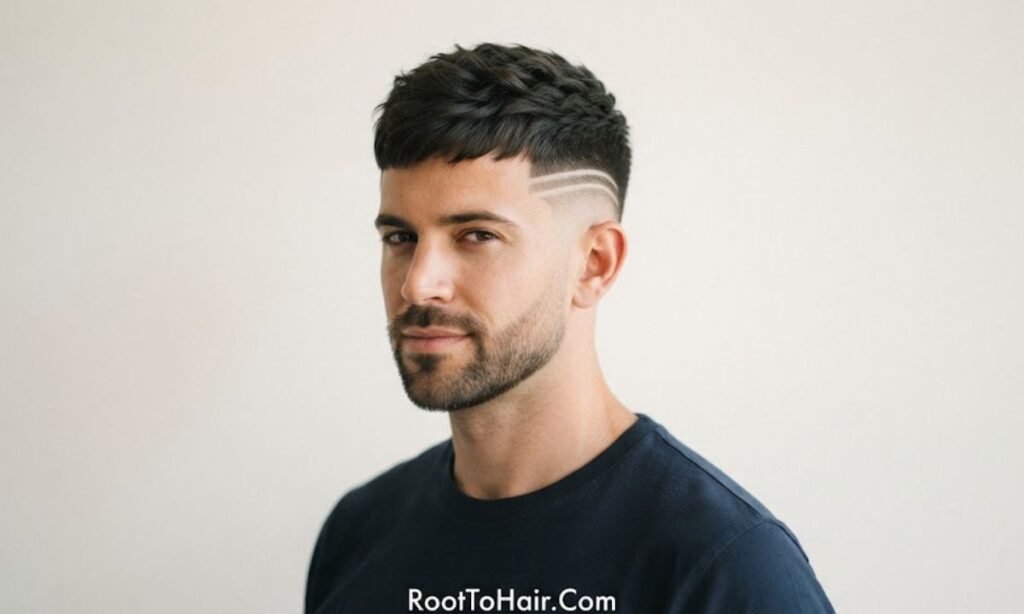
Short Description: Two thin lines running side by side with a narrow strip of hair between them.
Design Placement: Side of the head above the ear, extending back from the temple.
Best Match: Looks good on short to medium hair and on wavy or straight textures where the gap between lines stays visible. Good for men who want something more noticeable than a single line.
What to Tell Your Barber: “Cut two parallel lines about a pencil-width apart, level with each other, above the taper.”
Styling & Maintenance: The strip in the middle grows in first, so the pair blurs sooner than one line. Plan a touch-up every two to three weeks.
Best Tip: Ask the barber to mark the gap before cutting so both lines stay even.
3. Short Angled Slash at the Temple

Short Description: A compact diagonal cut, a little like a comma, placed at the front of the taper.
Design Placement: Right at the temple, angled upward toward the hairline.
Best Match: Works well with textured crops and quiffs, since it draws the eye toward the front. Suits round and square faces that benefit from an angular accent.
What to Tell Your Barber: “Keep the temple taper tight and add a short angled slash pointing up and back, about an inch long.”
Styling & Maintenance: It is small enough to stay tidy between visits. Wipe the area clean after showering so no product builds up around the cut.
Best Tip: Keep the slash short; a longer one competes with the hairline.
4. Simple Curved Razor Arc
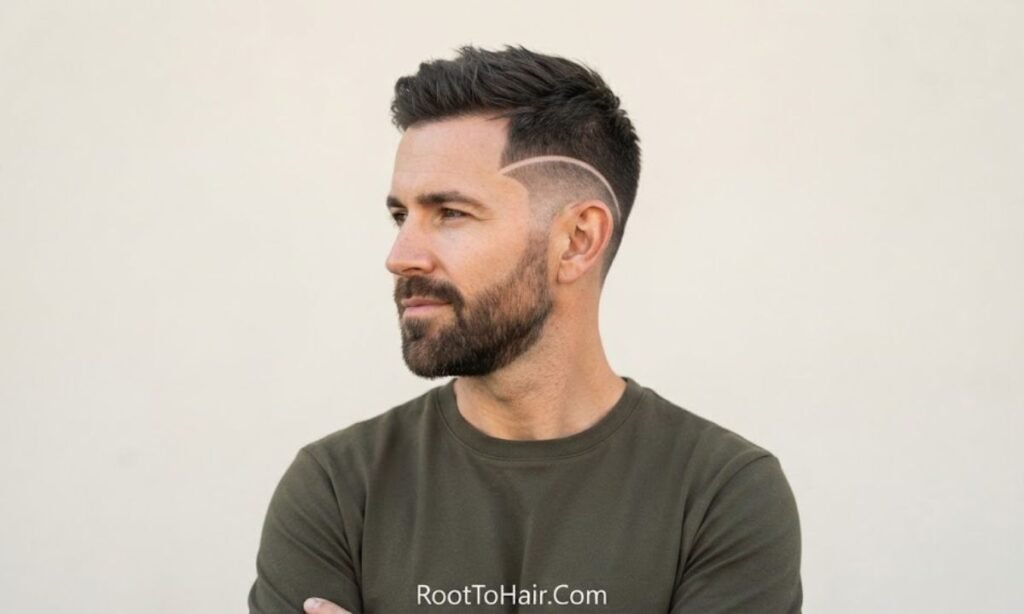
Short Description: A single soft curve that mirrors the shape of the ear or skull.
Design Placement: Side, rising from behind the ear and arching toward the temple.
Best Match: Particularly flattering with curly or wavy tops, where a curved line echoes the hair’s natural movement. Suits men who prefer softer shapes over sharp angles.
What to Tell Your Barber: “I’d like one smooth arc following the line of my ear, with the high taper blending cleanly beneath it.”
Styling & Maintenance: Curves reveal small errors quickly, so book a barber who is comfortable with freehand work. Keep the surrounding hair clean-shaven for contrast.
Best Tip: Look at a mirror profile photo of yourself and show the barber where the arc should peak.
5. Hard Part with High Taper
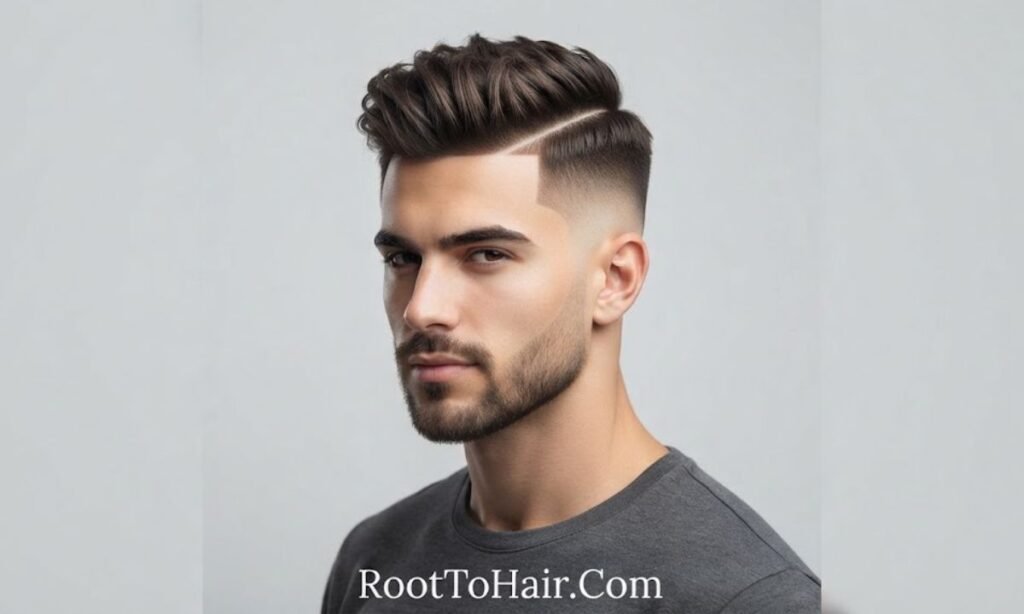
Short Description: A razor-defined part line on the top, paired with a high taper on the sides.
Design Placement: On the top side of the head, where the hair parts connect visually to the taper.
Best Match: Great for straight and slightly wavy hair in short to medium lengths, and for a polished, classic personal style. Works across most face shapes.
What to Tell Your Barber: “Cut a hard part on the left with a razor, then taper the sides high and clean.”
Styling & Maintenance: Comb the hair away from the line and finish with light hold. Re-cut the part when it starts looking fuzzy, usually before the taper loses its shape.
Best Tip: Put the part where your hair naturally falls, because forcing it makes daily styling harder.
6. Vertical Side Slit

Short Description: A thin vertical cut that runs up from the ear toward the top of the taper.
Design Placement: Side, above and slightly in front of the ear.
Best Match: Suits short, dense hair that holds an edge well. Often chosen by men with a sporty or streetwear style.
What to Tell Your Barber: “One vertical slit above the ear, medium length, with the high taper kept neat around it.”
Styling & Maintenance: Pair it with a simple top such as a short crop so the slit stays the focus. Check the edges weekly, since vertical lines show regrowth quickly.
Best Tip: Ask for the slit to start slightly below the taper height so it feels connected to the cut.
7. Razor Edge-Up Along the Temple

Short Description: A deliberately sharp, shaved outline around the temple and front hairline, without any extra pattern.
Design Placement: Temple and the front of the hairline.
Best Match: Ideal for anyone who wants a crisp frame rather than a decorative design. Looks sharp on buzz cuts, crops and slick backs.
What to Tell Your Barber: “Shape up my temples with a razor and keep a hard, clean edge from the hairline to the sideburn.”
Styling & Maintenance: It reads as neat from the first day, but grows in noticeably within about two weeks. Avoid touching the edge with a home trimmer.
Best Tip: Request a natural-looking hairline instead of a perfectly straight one, so the cut flatters your forehead.
8. Behind-the-Ear Notch Line
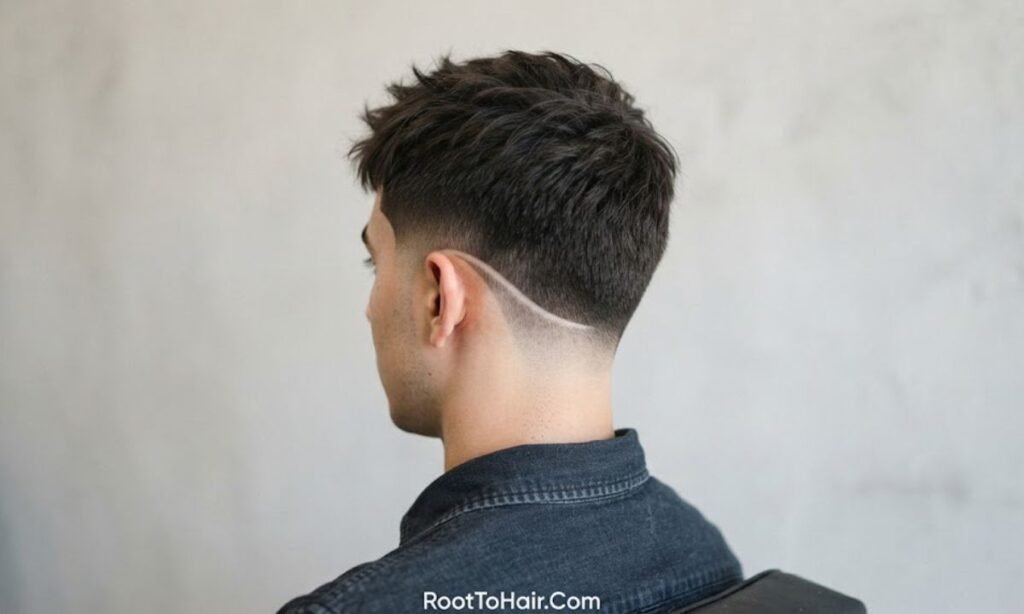
Short Description: A short, angled line placed just behind the ear, almost like a signature.
Design Placement: Side-back, behind the ear, where the taper starts to curve toward the neck.
Best Match: Good for men who want a design that is mostly visible in profile or from behind. Works with any top length.
What to Tell Your Barber: “Add a small angled notch behind the ear, no longer than my thumb, and keep everything else clean.”
Styling & Maintenance: Since it is tucked away, it needs little styling. It stays readable for a good while as the area has fewer cowlicks.
Best Tip: Choose an angle that follows your head’s curve; a straight line behind the ear can look off-balance.
9. Stepped Corner Line
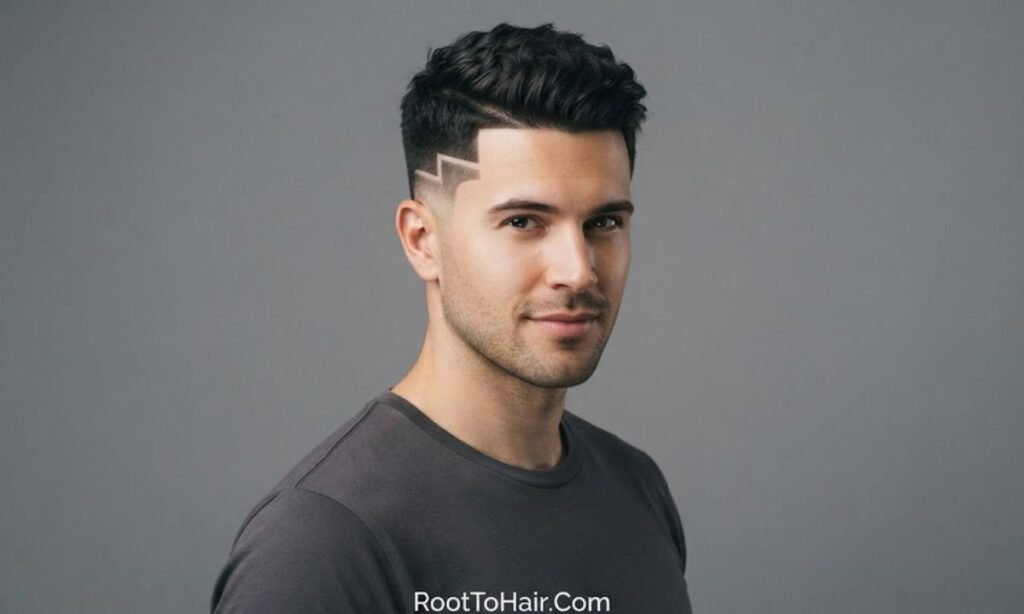
Short Description: A single line that turns once at a right angle, forming a neat step.
Design Placement: Side of the head, starting at the temple and stepping downward toward the sideburn.
Best Match: Complements men with strong, defined jawlines and short, structured tops. A good first step toward geometric work.
What to Tell Your Barber: “Cut one step-shaped line at the temple, angles sharp, and keep the taper high underneath.”
Styling & Maintenance: A structured top, such as a short side part, supports the geometry. Re-sharpen the corner when it softens, because corners blur first.
Best Tip: Ask for an exact 90-degree turn, since small angle errors are easy to spot.
10. Neckline Accent Line
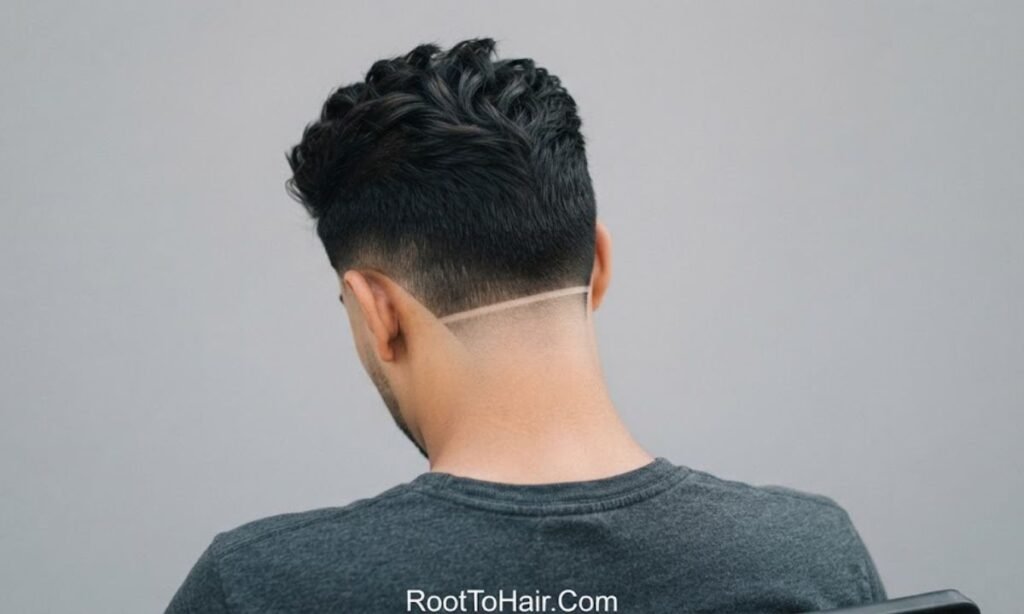
Short Description: A thin shaved line that follows the nape, either above a natural neckline or as a short parallel line.
Design Placement: Neckline and back of the head.
Best Match: Works with longer tops, curls and slick backs, where the back view matters more. Good for men who prefer a hidden detail.
What to Tell Your Barber: “Keep my neckline natural and add one fine line a little above it, following the curve.”
Styling & Maintenance: Easy to maintain at home with a steady hand and a mirror, but a barber visit gives better precision. Keep the area dry and free of product.
Best Tip: Take a back photo after the cut so you can show future barbers exactly how it should look.
Intermediate Geometric Designs
Eleven sharper patterns that stand out more and need more regular upkeep.
11. V-Shape Razor Design
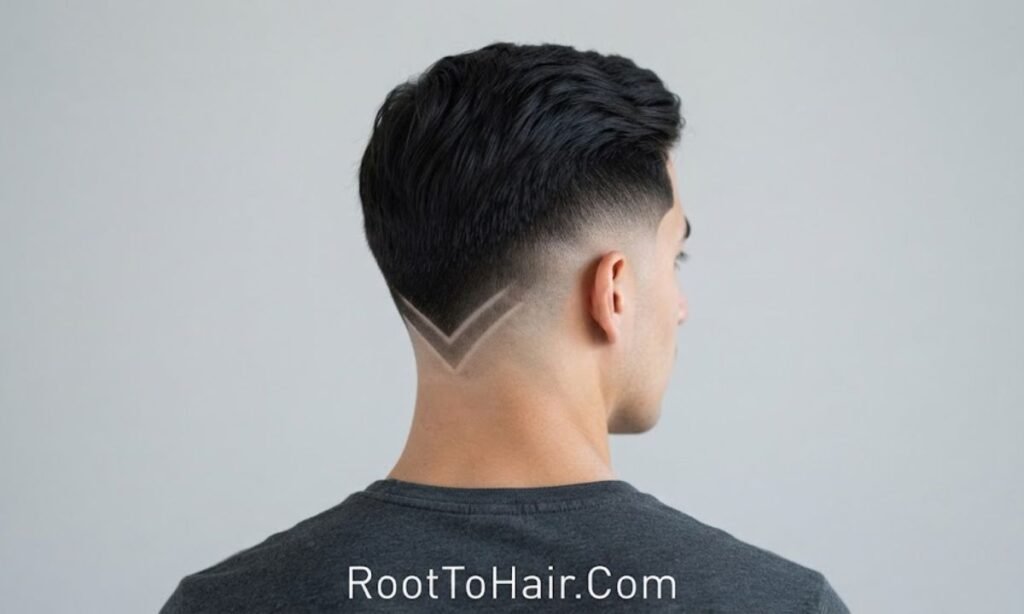
Short Description: A bold V formed by two lines meeting at a point, pointing forward or downward.
Design Placement: Temple or side, directly above the taper.
Best Match: Looks strong on square and oval faces and on short, dense hair. A good choice for men who want a clear shape with a masculine edge.
What to Tell Your Barber: “Cut a V shape above my temple taper, with the point facing the front of my head.”
Styling & Maintenance: Keep the top simple, like a textured crop, so the V does its job. Refresh every two to three weeks as the point blurs first.
Best Tip: Agree on the point’s direction before the barber starts, as it changes the whole mood.
12. Triangle Cut-Out at the Temple

Short Description: A small shaved triangle cut into the hair at the temple.
Design Placement: Temple, slightly above the ear line.
Best Match: Suits short to medium hair that holds structure, such as a French crop. Works well with defined jawlines.
What to Tell Your Barber: “Carve a small triangle at the temple, with a flat base and the tip pointing back.”
Styling & Maintenance: It stays crisp with a fresh razor edge and little else. Avoid heavy gel nearby that can flatten the contrast.
Best Tip: Keep the triangle small on the first try; it is easy to enlarge later.
13. Crossed Razor Lines
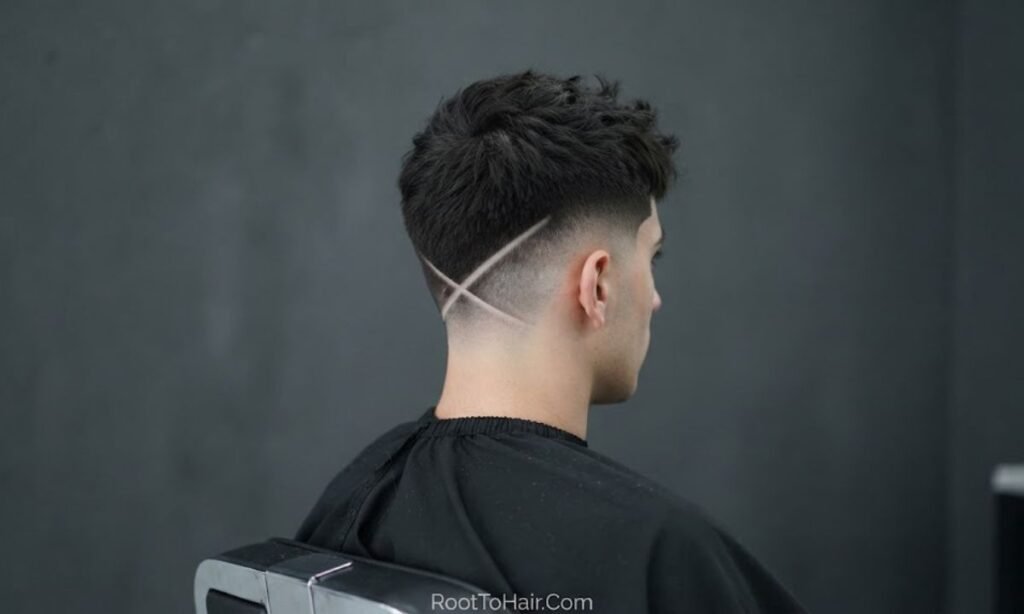
Short Description: Two lines that intersect to form an X, cut with different angles.
Design Placement: Side of the head, above the ear.
Best Match: Best on closely cropped or buzzed tops where the pattern is the focal point. Suitable for straight and wavy hair.
What to Tell Your Barber: “Add two lines crossing in the middle, equal length, angled at roughly 45 degrees.”
Styling & Maintenance: Needs a barber comfortable with symmetry. Expect touch-ups about every two weeks, as the intersection fills in first.
Best Tip: Ask for slightly different line lengths to give the X a more modern look.
14. Zigzag Razor Line
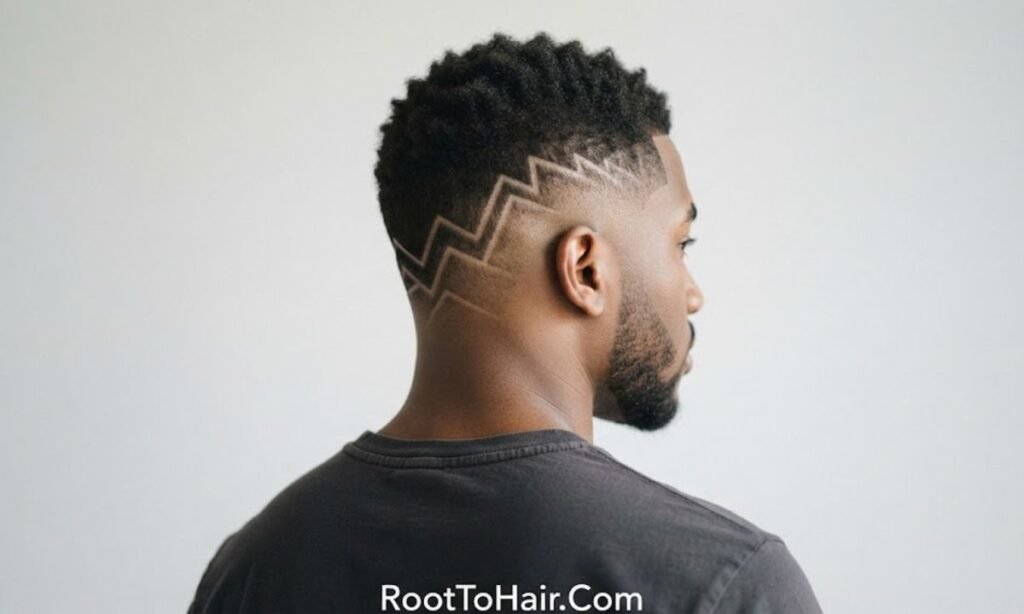
Short Description: A sharp, repeated angular line that moves up and down in a zigzag.
Design Placement: Side, running from the temple toward the back.
Best Match: Works on short hair with some density, and on men who like a streetwear or energetic style. Pairs well with curly tops.
What to Tell Your Barber: “One zigzag line above the taper, three or four peaks, evenly spaced.”
Styling & Maintenance: The peaks lose definition quickly, so a refresh every two to three weeks keeps it clear. Use light styling so the top does not overpower it.
Best Tip: Fewer, larger peaks look cleaner than many small ones.
15. Arrow-Shaped Design
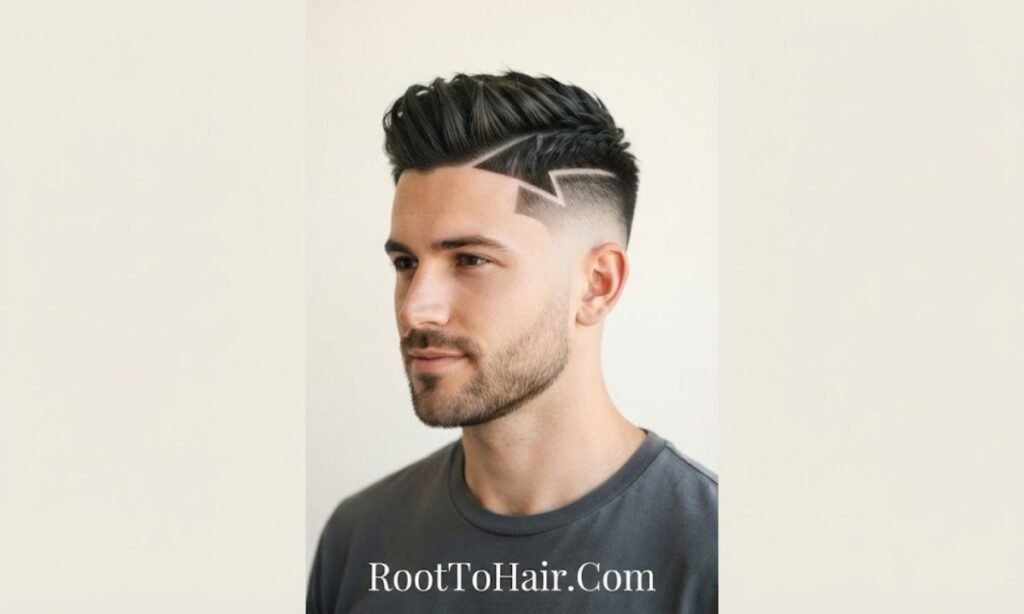
Short Description: A line ending in a pointed arrowhead, often directing toward the front of the face.
Design Placement: Side, pointing from the back toward the temple.
Best Match: Suits short crops and slick backs, giving the haircut a sense of direction. Often used by men who like confident, graphic styles.
What to Tell Your Barber: “Cut a long line with a small arrowhead at the temple end, pointing forward.”
Styling & Maintenance: Brush the top back or up to expose the arrow. Keep the head shaved clean around it for contrast.
Best Tip: Make sure the arrow points toward the face, not away, for a more natural flow.
16. Stacked Chevron Lines
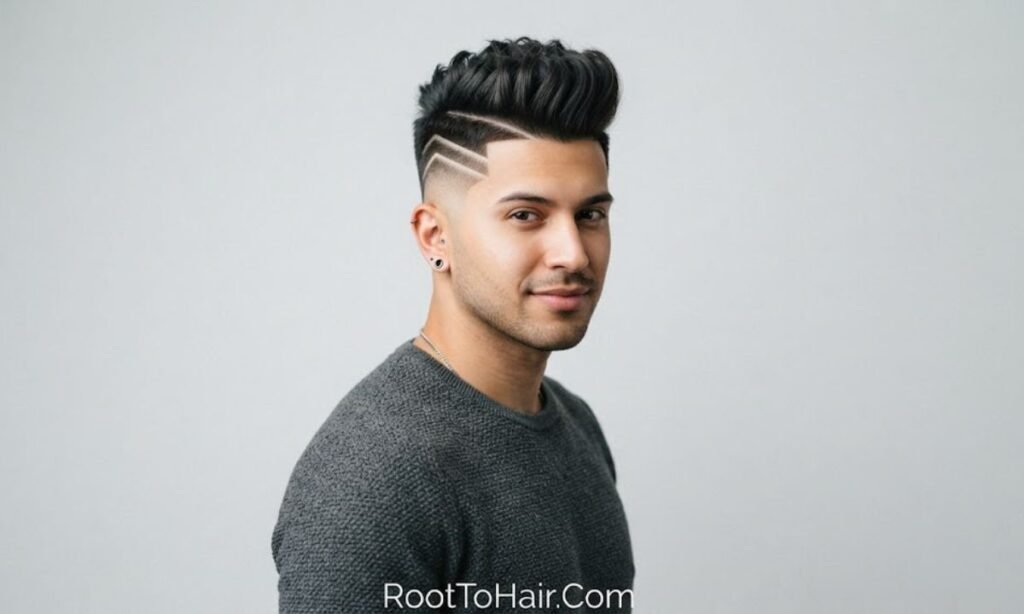
Short Description: Two or three V-shaped lines stacked above each other, like chevron stripes.
Design Placement: Side-back area, behind the temple and above the ear.
Best Match: Works best with dense hair and a sharp taper, and with men who want a bold pattern without a full mural. Good on longer faces when the lines are kept horizontal in feel.
What to Tell Your Barber: “Stack three chevrons evenly behind my temple, with equal spacing, and keep the taper high.”
Styling & Maintenance: The spacing needs precision, so choose an experienced barber. A refresh around every two weeks maintains the spacing.
Best Tip: Start with two chevrons; you can always add a third later.
17. Diamond Pattern
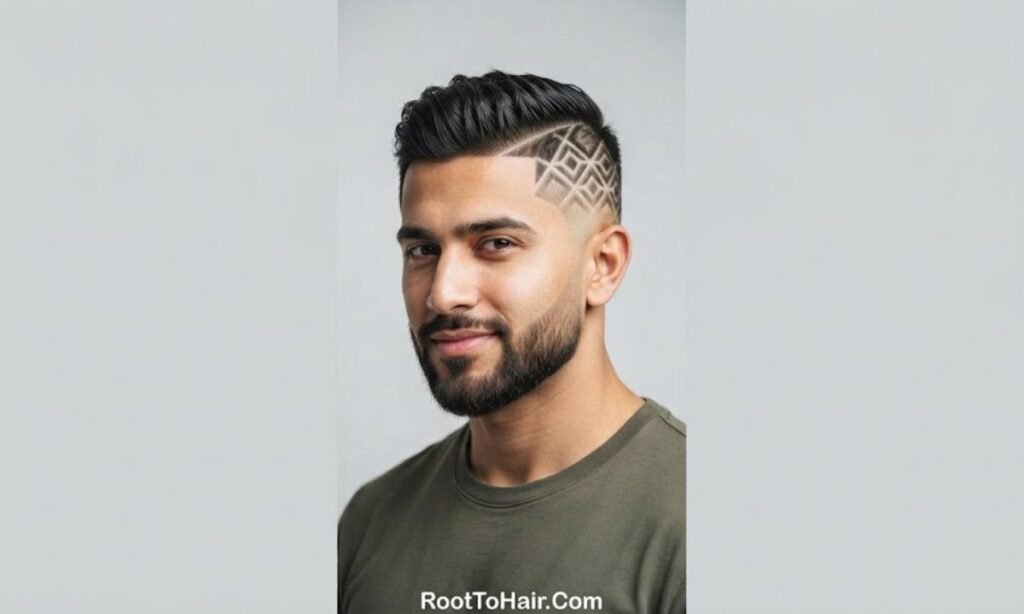
Short Description: A closed diamond shape, either outlined or filled, on the side of the head.
Design Placement: Side, between the temple and the ear.
Best Match: Suits short to medium hair and defined face shapes such as square and oval. Looks strong with slick backs and crops.
What to Tell Your Barber: “Cut a medium-sized diamond outline at the side, symmetrical, with clean points.”
Styling & Maintenance: Closed shapes need a steady hand and clear edges. Clean them with a damp cloth to avoid any buildup inside the shape.
Best Tip: Ask for the diamond to be centered between the temple and ear so it does not look pushed to one side.
18. Crosshatch Grid Design
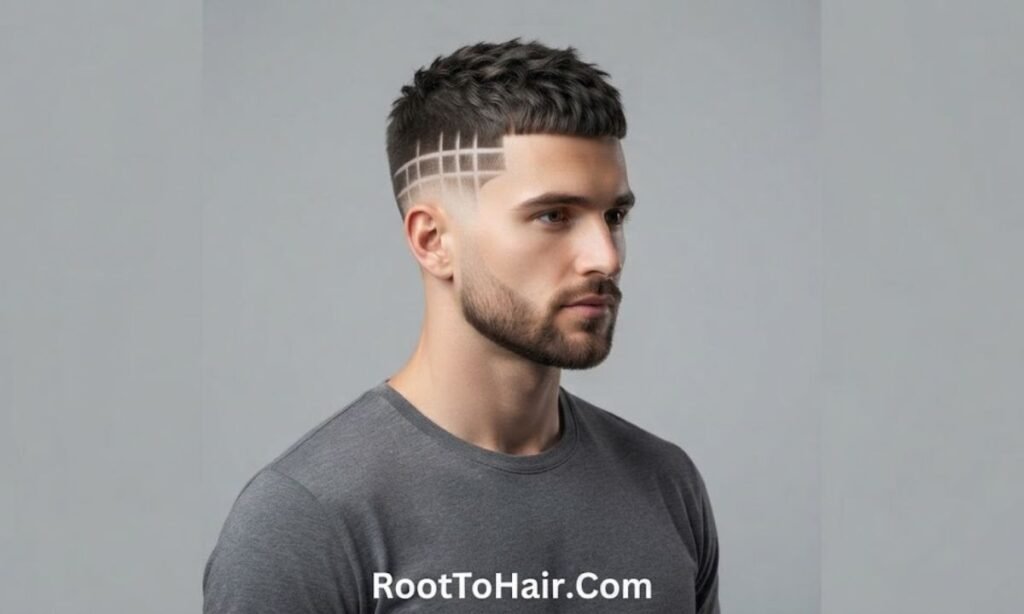
Short Description: A small grid formed by crossing parallel lines at right angles.
Design Placement: Side of the head, above the ear.
Best Match: Best on short, dense hair with strong contrast. Fits men who like precise, graphic details.
What to Tell Your Barber: “Add a small grid, three lines each way, with evenly spaced squares.”
Styling & Maintenance: The grid demands close upkeep, because the small squares fill in rapidly. Every one to two weeks may be needed to keep it clear.
Best Tip: Keep the grid compact so it stays readable as the hair grows.
19. Staircase Geometric Pattern
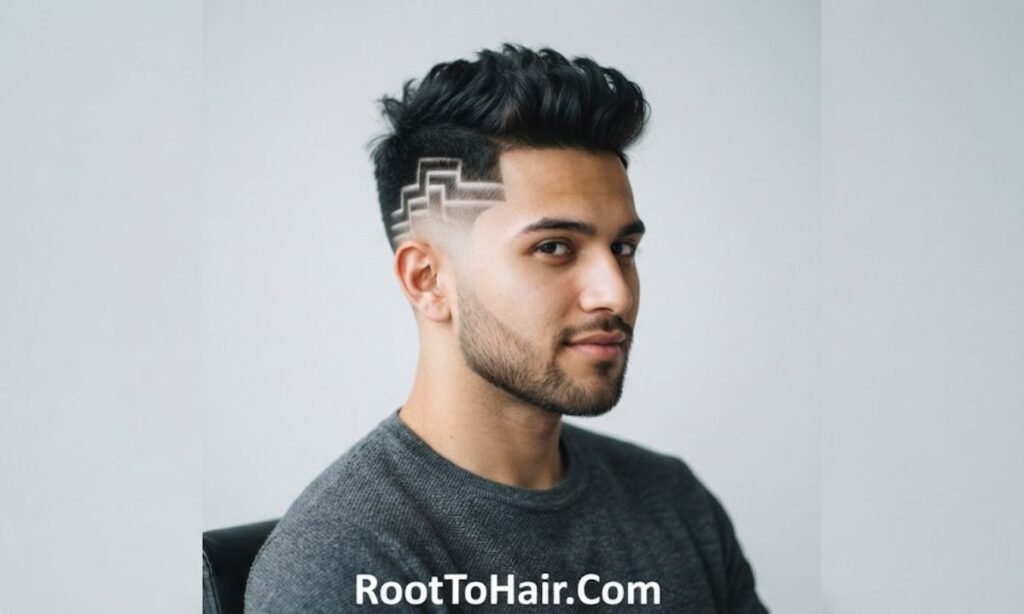
Short Description: A series of steps climbing diagonally from the neckline toward the temple.
Design Placement: Side-back, rising from behind the ear.
Best Match: Looks great with structured tops like a pompadour or quiff and works well for oval and heart-shaped faces. Suits men who like architectural looks.
What to Tell Your Barber: “Cut a staircase of four steps rising toward the temple, each step equal in size.”
Styling & Maintenance: Style the top upward so it echoes the staircase’s direction. Touch up the steps before they blur into each other.
Best Tip: Keep the steps even; uneven steps are the first thing people notice.
20. Asymmetric Geometric Side Panel
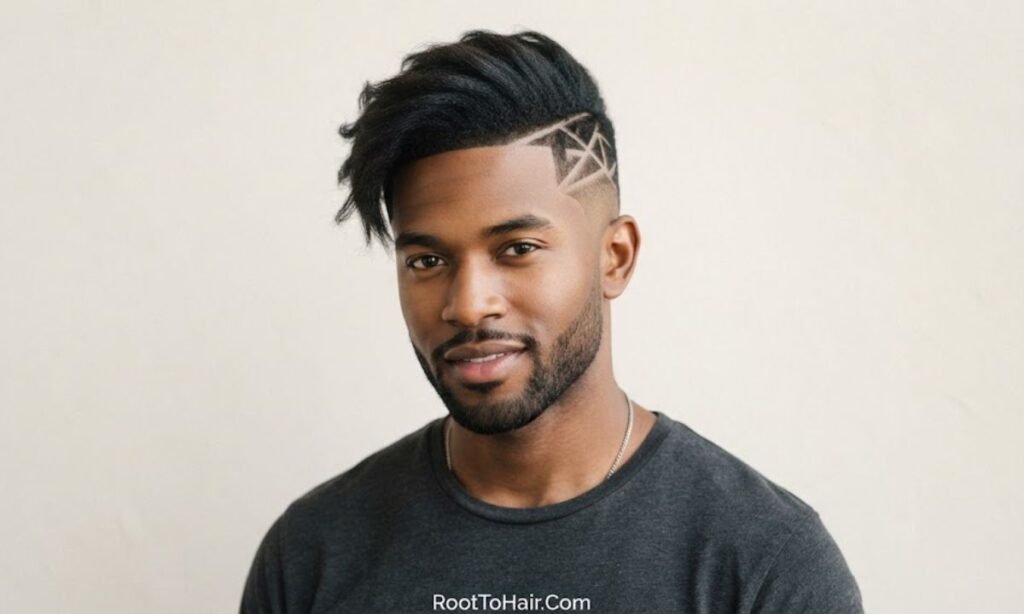
Short Description: A cluster of angular shapes, only on one side, giving a deliberately lopsided look.
Design Placement: One side of the head, covering the temple and side.
Best Match: Great for men with a confident, fashion-forward style and short to medium hair with a side-swept top. Works well when the other side is kept clean.
What to Tell Your Barber: “Design only the right side with a mix of lines and one triangle, and keep the left side a clean high taper.”
Styling & Maintenance: Part the top toward the plain side so the design is on display. Refresh every two to three weeks.
Best Tip: Decide on your strongest side first, based on your natural part.
21. Hexagon Pattern Behind the Ear

Short Description: A small hexagon outline, sometimes with a line inside, set low on the side-back.
Design Placement: Side-back, behind the ear.
Best Match: Suits short hair with good density, and men who prefer a design that is visible mostly from the side or back. Fits any top style.
What to Tell Your Barber: “Cut a small hexagon behind my ear, equal sides, and keep the taper clean around it.”
Styling & Maintenance: The shape is delicate, so avoid pulling clippers over it at home. Refresh before the sides lose definition.
Best Tip: Keep the hexagon small to avoid a cluttered look.
Advanced Freestyle Designs
Ten artistic designs that need an experienced barber and regular refreshing.
22. Flowing Freestyle Curves

Short Description: Smooth, flowing S-curves that move around the side of the head with no strict pattern.
Design Placement: Side and side-back, from the temple toward the ear.
Best Match: Looks best on short hair with clear contrast, and on men who like a creative, expressive style. Works with waves and curls.
What to Tell Your Barber: “I’d like flowing curves from the temple to behind the ear, no sharp corners, and my taper kept high.”
Styling & Maintenance: Let the top stay textured and natural so the curves read as art. Touch up every couple of weeks, as thin curves disappear fast.
Best Tip: Bring one or two reference photos so the barber understands the “flow” you want.
23. Wave Pattern Razor Design
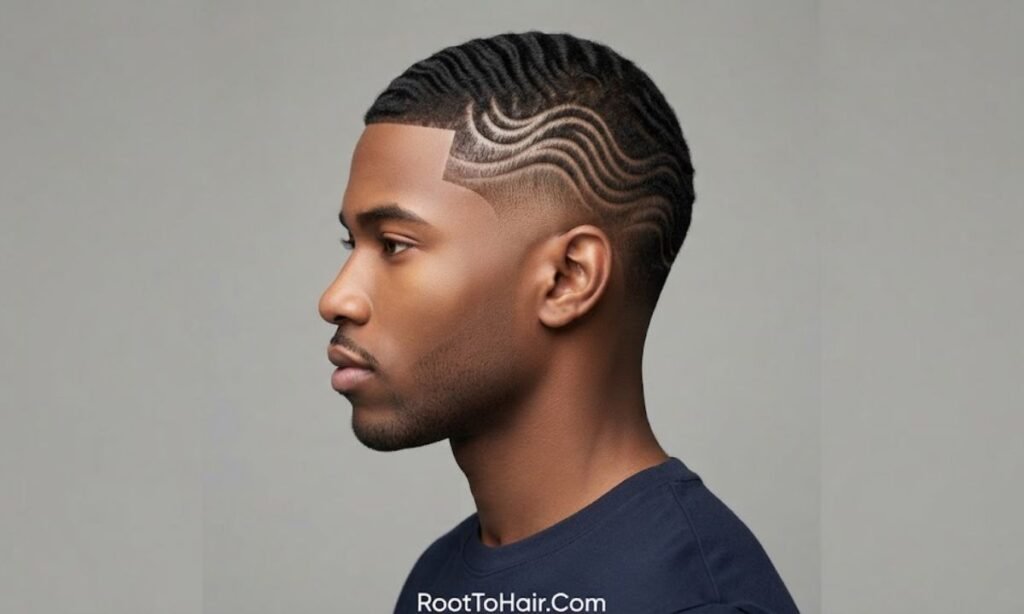
Short Description: Repeated wave-like lines that ripple across the side of the head.
Design Placement: Side, between the temple and the ear.
Best Match: Works nicely with waves on top or a textured crop, giving a matching rhythm. Suitable for dense, short hair.
What to Tell Your Barber: “Cut three wavy lines across the side, evenly spaced, with the high taper below.”
Styling & Maintenance: The pattern should be left visible, so avoid long front pieces covering the side. Plan regular refreshes, as waves blur quickly.
Best Tip: Ask for consistent wave size so the design looks deliberate.
24. Lightning Bolt Freestyle
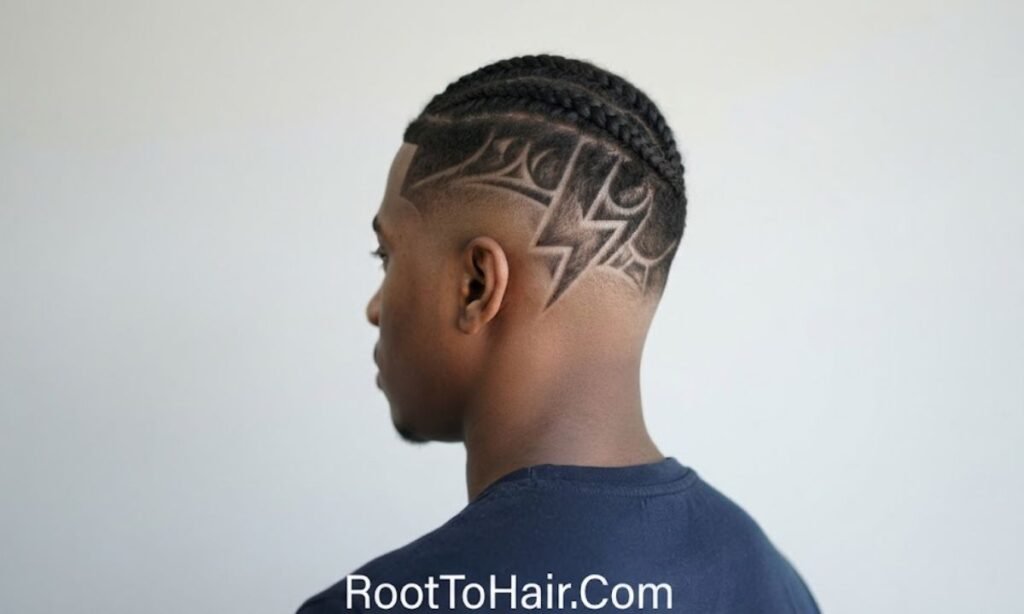
Short Description: A sharp, jagged bolt that cuts through the side, usually angled upward.
Design Placement: Side of the head, above the ear.
Best Match: Suits short crops, buzz cuts and spiky tops, and a bold personality. Best on dense hair.
What to Tell Your Barber: “Shave a lightning bolt on the right side, tall and angled, with clean points.”
Styling & Maintenance: A short top keeps the focus on the bolt. Re-sharpen the points frequently, as they soften first.
Best Tip: Choose a bolt size that matches the height of your taper to keep it balanced.
25. Abstract Brush-Stroke Lines
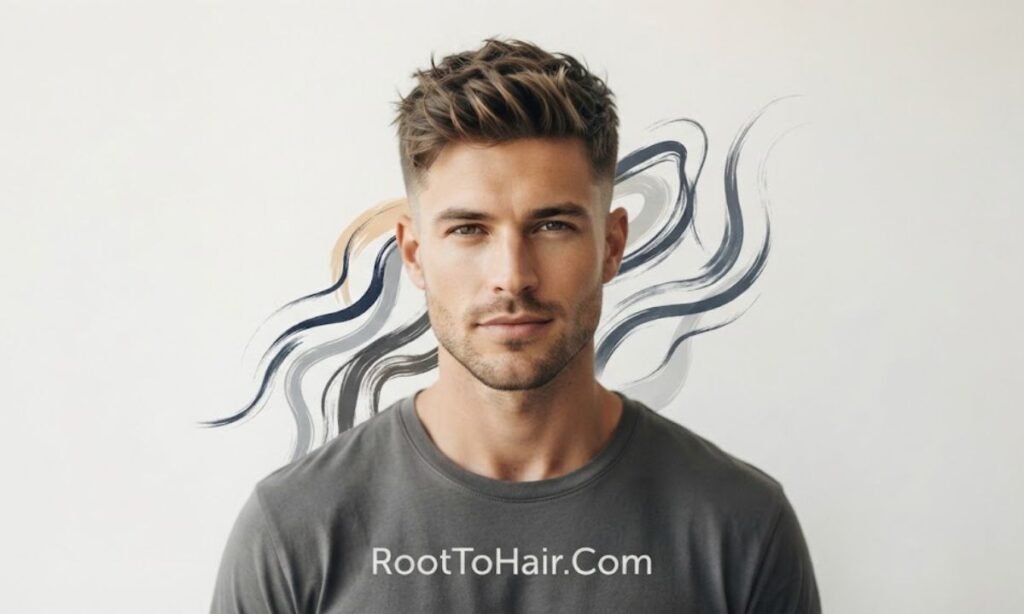
Short Description: Uneven, tapered strokes that look like paint brushed across the side.
Design Placement: Side and side-back area.
Best Match: Works well for creative styles, messy textured tops and men who prefer an artistic, unpolished look. Looks good on thick hair.
What to Tell Your Barber: “Give me three or four tapered strokes, thick at one end and thin at the other, leaning back.”
Styling & Maintenance: Keep the top loose and messy to complement the strokes. Because the strokes are thin at the tips, expect regrowth to show quickly.
Best Tip: Ask for varying stroke thickness to create depth.
26. Spiral Swirl Design
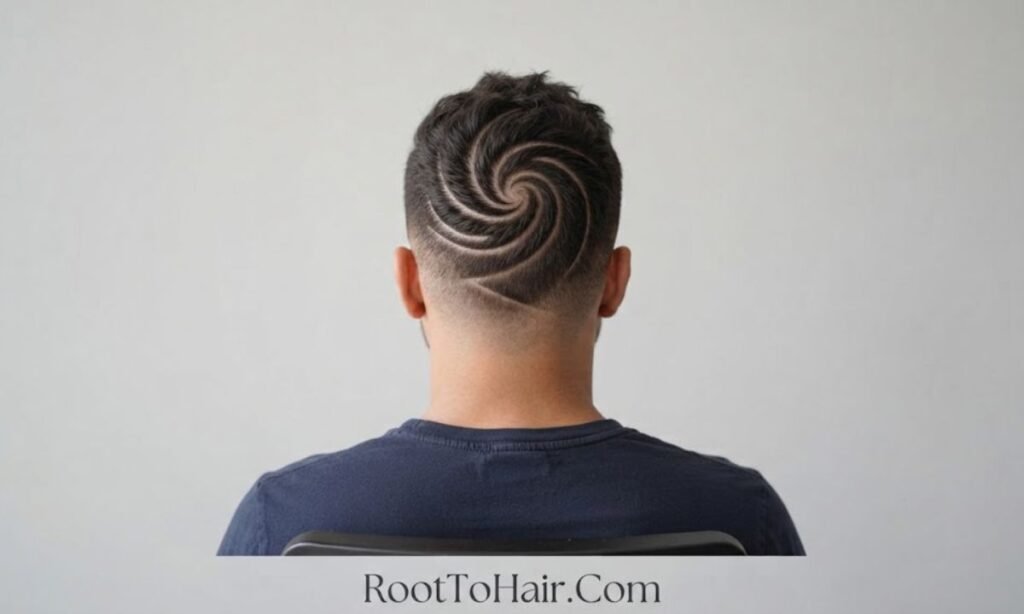
Short Description: A circular swirl that curls inward, like a small whirlpool.
Design Placement: Side, centered above the ear.
Best Match: Suits short hair with strong contrast, and men comfortable with an eye-catching look. Often paired with a simple top.
What to Tell Your Barber: “Cut a spiral about the size of a coin, starting from the outside and curling in.”
Styling & Maintenance: Needs precise work, so allow time at the chair. Refresh every one to two weeks, as the spiral’s inner lines fill in first.
Best Tip: Keep the spiral fairly open, because tight swirls blur quickly.
27. Multi-Line Fan Design
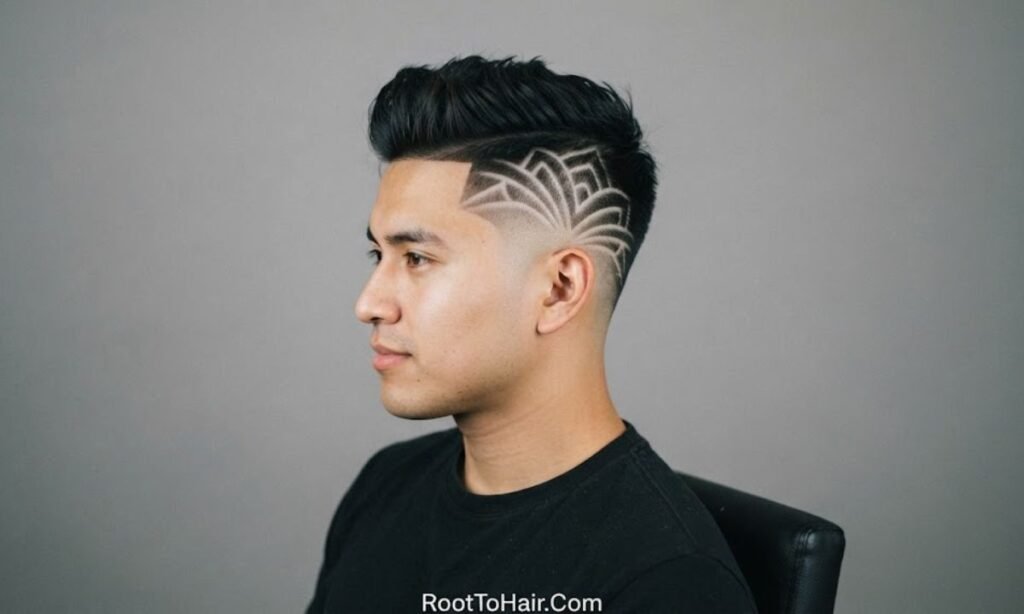
Short Description: Several lines radiating from a single point, like an open fan.
Design Placement: Side-back, with the starting point near the ear.
Best Match: Works nicely with slicked back hair or a pompadour, as the lines point toward the top. Good for men with defined cheekbones.
What to Tell Your Barber: “Fan out five lines from behind my ear, evenly spaced, spreading up toward the crown.”
Styling & Maintenance: Keep the surrounding skin clean-shaven for contrast. Re-cut the lines before they merge into each other.
Best Tip: Fewer lines with wider gaps look sharper than many tight lines.
28. Flame-Style Freestyle

Short Description: Curved, pointed tongues of hair that rise like flames from the taper line.
Design Placement: Side, rising from the taper toward the top.
Best Match: Suits short, dense hair and a bold, high-energy style. Works with curly or textured tops that echo the movement.
What to Tell Your Barber: “Create flame shapes rising from the taper, three tongues, curved at the tips.”
Styling & Maintenance: Style the top with volume so it appears to continue the movement. Touch up often, since pointed tips fade fast.
Best Tip: Ask for slightly different heights in each flame to make it look natural.
29. Curly Top with Freestyle Curves
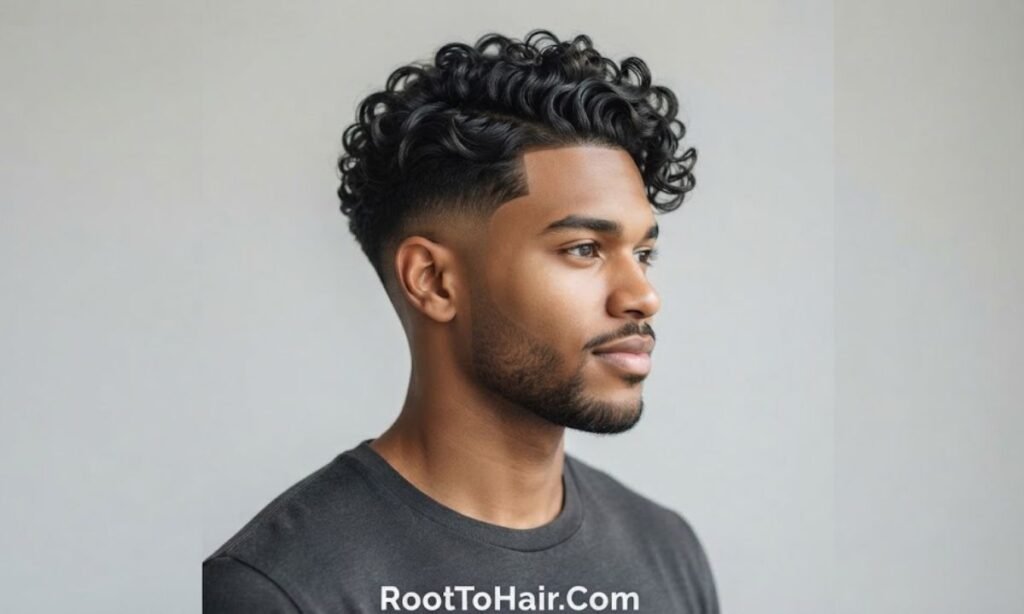
Short Description: A soft, curly top paired with loose freestyle curves cut into the sides.
Design Placement: Side and temple, mirroring the curl pattern.
Best Match: Made for curly and coily hair, where the clean-shaven sides give the curls a sharp frame. Works with most face shapes.
What to Tell Your Barber: “Keep my curls long on top, high taper on the sides, and add a few loose curves that echo my curl shape.”
Styling & Maintenance: Use a curl cream on damp hair and let it dry naturally or diffuse it. Refresh the curves when the sides start to fuzz.
Best Tip: Ask the barber to cut the design before the final top trim, so the curls frame it properly.
30. Textured Quiff with Layered Geometric-Freestyle Hybrid

Short Description: A mix of straight lines and curved details layered on the side, paired with a tall textured quiff.
Design Placement: Side and side-back, spanning from the temple to behind the ear.
Best Match: Great for medium-length tops with natural volume and for men who like layered, detailed looks. Works on oval and square faces.
What to Tell Your Barber: “Combine a couple of straight lines with one curve on the side, keep the quiff textured and the taper high.”
Styling & Maintenance: Blow-dry the quiff upward and finish with light paste. Expect more frequent barber visits to keep every layer clear.
Best Tip: Pick one dominant element, either the lines or the curve, so the design does not feel busy.
31. Full-Side Freestyle Panel

Short Description: A large, unified design that fills most of the side, mixing lines, curves and negative space.
Design Placement: Entire side of the head, from the temple to behind the ear.
Best Match: For confident men with short, dense hair who want the haircut to be a statement. Suits slick backs and short crops.
What to Tell Your Barber: “Fill the side with a flowing freestyle panel, keep the shapes balanced and leave some blank space.”
Styling & Maintenance: Keep the top simple, or the combination will compete. Plan on regular refreshes, since large designs lose definition quickly.
Best Tip: Book a longer appointment and discuss the concept first; rushed freestyle often looks messy.
Best Designs for Your Hair Type
Hair type influences how clearly a razor design shows. Sharp contrast between the shaved line and the surrounding hair makes any pattern easier to see, so the thickness, curl pattern and density of your hair decide whether a design looks bold or soft. The top hairstyle also affects the balance: a voluminous curly top draws attention upward, while a close crop makes the sides the focus.
| Hair Type | Design Style | Recommended Placement | Why |
| Straight | Clean lines, hard parts, geometric shapes | Temple, side | Straight hair lies flat, so sharp edges show clearly |
| Wavy | Single lines, curves, soft geometric shapes | Side, side-back | Gentle curves echo the natural wave pattern |
| Curly | Curved lines, arcs, simple freestyle | Side, behind the ear | Curves complement curls, and clean sides frame the top |
| Coily | Bold lines, geometric patterns, crisp edges | Temple, side | Dense hair creates strong contrast with the shaved skin |
| Thick | Detailed geometry, multi-line designs | Side, side-back | Density holds fine detail and gives sharp definition |
| Fine | Simple lines, minimal shapes | Temple, side | Less contrast means simple designs read more clearly |
Straight hair tends to show crisp lines easily, though it can also reveal patchiness if the hair is thin. Wavy hair works well with both soft and sharp designs, and you can choose the mood of the cut. Curly and coily hair often make dramatic contrast because the shaved area stands apart from voluminous curls, but very fine or soft details can blend into the stubble as the hair grows back.
Thick hair generally supports more elaborate work, while fine or thin hair benefits from simpler lines that remain readable. Hair density also affects how often the design needs refreshing: denser hair tends to fill in the shaved lines sooner, so detailed patterns may need more frequent touch-ups. Remember that every head is different, so use these as starting points and ask your barber to adjust.
Which Design Suits Your Face Shape?
Design direction can influence visual balance. Vertical lines may draw the eye upward and can create the appearance of length, while horizontal or angled lines can add width or movement. Placement near the temple tends to frame the face, whereas designs farther back may be less noticeable from the front. These are guidelines, not rules, and personal style matters more than any chart.
| Face Shape | Suitable Design Direction | Why It Can Work | Consider Avoiding |
| Oval | Most designs, including geometric and curved | The balanced proportions are versatile | Overly large designs that overwhelm the face |
| Round | Angular lines, vertical slashes, V-shapes | Sharp angles may help add definition | Very rounded swirls that echo the face shape |
| Square | Curved lines, arcs, soft freestyle | Curves can balance a strong jawline | Heavy blocky shapes that add more angularity |
| Heart | Designs placed lower, side-back patterns | May help balance a wider forehead | Large, high temple designs that add width up top |
| Diamond | Subtle temple designs, soft curves | Can soften wide cheekbones | Bold designs that sit at the widest point |
| Oblong | Horizontal or angled lines, side panels | May create the appearance of width | Tall vertical designs that add more length |
Triangle (or pear) faces, with a narrower forehead and wider jaw, often suit designs placed higher at the temple and sides, which can add visual width near the top. A slightly fuller top can support that balance.
Round faces often look sharper with angled designs, while square faces can benefit from curved lines that soften their structure. Oblong faces may look more balanced with designs that spread sideways. Still, plenty of men wear designs that “break the rules” because they like the look. Use face shape as one input, not the deciding factor.
How Complex Can Your Design Be?
Design complexity ranges across three practical levels, and the right one depends on your comfort with upkeep and your barber’s skill.
Simple designs use one or two clean lines. They are easy to maintain, work for subtle looks and suit offices or conservative settings. Most barbers can do them comfortably.
Intermediate designs involve multiple lines and geometric patterns. They are more noticeable, require good precision and usually need regular refreshing to stay crisp.
Advanced designs include detailed freestyle patterns, multiple curves and angles. They demand the most barber precision, often take longer in the chair and usually need the most frequent refreshing.
| Design Level | Pattern Type | Maintenance | Barber Skill | Best For |
| Simple | One or two lines, small accents | Low | Basic to moderate | First-timers, subtle looks, office-friendly styles |
| Intermediate | Geometric shapes, multiple angled lines | Moderate | Moderate to high | Men who want a clear statement with manageable upkeep |
| Advanced | Freestyle curves, multi-element patterns | High | High, ideally experienced with razor art | Style-focused men who visit the barber often |
Where Should the Design Go?
Placement decides how visible the design is, how it frames your face and how quickly it needs fixing. The temple is the most common spot because it sits at the front and frames the face. The side, including the area above the ear, offers the largest canvas for shapes. Side-back placement, behind the ear, keeps the design subtle from the front but clear from the side and back. The neckline is the most discreet and good for small accents.
Combined placements, such as a temple line connecting to a side pattern, can create a flowing look but need careful planning so the whole cut feels connected.
| Placement | Visual Effect | Best Design Type | Maintenance |
| Temple | Frames the face, draws attention to the front | Simple lines, edge-ups, small shapes | Moderate; temple hair grows quickly |
| Side | Creates a bold focal point | Geometric and freestyle patterns | Moderate to high |
| Side-Back | Visible from the profile and rear | Curves, fans, hexagons | Moderate |
| Neckline | Subtle and mostly seen from behind | Fine lines, accents | Low to moderate |
Compatibility with the top hairstyle matters too. Short tops like crops and buzz cuts show off the side designs completely, while longer or fuller tops may partially cover the temple. If your top falls across the side, consider placing the design lower or further back so it stays visible.
How to Tell Your Barber What You Want
Clear communication prevents most haircut disappointments. Cover these eight points:
- Taper height: Say how high you want the taper to start, such as around the temples and sideburns, or higher on the sides.
- Design location: Specify temple, side, behind the ear or neckline.
- Design shape: Describe the pattern, such as a line, a V or a curve, and its size.
- Top length: Mention how much length you want left on top and how you plan to style it.
- Hair texture: Tell the barber if your hair is curly, wavy, coily or fine, and how it behaves.
- Neckline: Choose natural, tapered or squared.
- Desired sharpness: Ask for soft and subtle or sharp and high-contrast.
- Reference photo: Bring a clear picture, ideally from the angle you care about, and point out what you like.
Example barber script: “Start the high taper just above my temples and blend it down around the ears. I’d like about two inches left on top, textured, because my hair is wavy. Add a V-shaped razor design on the left side, medium size, with sharp edges, and leave the neckline tapered. Here’s a photo of the design I like.”
Adjust it to your own cut. If the barber suggests changes because of your hair growth pattern or density, listen, since that advice often saves the design from looking uneven.
How Long Does the Design Last?
Razor designs are temporary. They start crisp and gradually lose definition as the shaved hair grows back, and a few factors determine how quickly this happens: hair growth speed, design sharpness, hair length, contrast and personal preference. Dark, dense hair shows regrowth sooner than light or fine hair because the contrast with the skin is stronger.
As a rough guideline only, many men refresh simple lines every two to three weeks, while detailed designs may look best with more frequent visits. Some people are happy to let designs soften for longer, so use this as a starting point rather than a rule.
| Design Type | Visibility as It Grows | General Refresh Need | Why |
| Simple Line | Stays recognizable for longer | Less frequent | Fewer edges to blur, and thicker lines hold shape |
| Geometric | Corners and gaps soften first | Moderate | Sharp angles and spacing depend on clean edges |
| Detailed Freestyle | Fine details fade quickly | More frequent | Thin curves and small elements fill in sooner |
Ask your barber how long they expect your specific design to look good, and book your next appointment before leaving the chair if you want to keep it sharp.
How to Style This Haircut
A high taper fade with a design needs a simple daily routine:
- Start with clean, slightly damp hair. Towel-dry after washing so the hair is not dripping.
- Apply an appropriate styling product. Use a small amount, such as paste, cream or pomade, depending on the finish you want.
- Blow-dry if volume or direction is needed. Use medium heat and lift the hair away from the scalp.
- Shape the top. Use your fingers or a comb to set the style you want.
- Keep the design visible. Make sure no stray hair or product covers the razor lines on the side.
- Finish lightly. A little texture spray or light hold is enough; too much product weighs the style down.
Straight hair: Use a light paste or clay and blow-dry for lift. Wavy hair: Add a texturizing cream, scrunch lightly and let some natural movement show. Curly hair: Apply curl cream to damp hair, then diffuse or air dry for definition. Coily hair: Moisturize first, then use a leave-in or butter to define coils and add shine.
Avoid piling on products, which can dull the contrast between hair and design. Wipe the shaved areas clean if gel or wax gets on them.
Best Top Styles to Pair With It
The top hairstyle determines the overall look, how visible the design is, and how much effort you will spend each morning. Short tops put the design on display, while voluminous tops can create contrast and attract attention upward.
| Top Style | Design Compatibility | Overall Look | Styling Effort |
| Textured Crop | Works with almost any design | Modern and easygoing | Low |
| Curly Top | Best with curved or freestyle designs | Bold and expressive | Moderate |
| Quiff | Pairs well with geometric and angled lines | Polished with volume | Moderate to high |
| Buzz Cut | Makes the design the main focus | Minimal and sharp | Very low |
| Slick Back | Works well with lines, fans and arrows | Classic and refined | Moderate |
A textured crop or French crop is the easiest all-rounder, since the short fringe leaves the sides fully visible. A quiff or pompadour adds height and works best with intermediate geometric designs. Waves and curly tops suit curved patterns and look especially clean against a tight high taper. A buzz cut is the lowest effort and shows every line clearly. A messy textured top relaxes a sharp design and gives a more casual feel. Choose based on your hair type and how much time you want to spend styling.
Mistakes to Avoid With This Cut
- Ignoring hair growth: A design that looks great on day one may blur quickly. Ask your barber how it will grow out.
- Making it too complicated: A detailed pattern is not always better. Start simpler if you are new to razor work.
- Picking a poor location: A design hidden under your top or placed awkwardly can waste the effort.
- Skipping the reference photo: Words alone can be misread, and a picture avoids confusion.
- Not explaining taper height: The taper sets the canvas, so be clear on how high you want it.
- Choosing a design that conflicts with the top: A busy design with a busy top can look cluttered.
- Overlooking hair density: Fine or sparse hair may not hold intricate details.
- Waiting too long to refresh: Detailed designs lose definition faster, so plan your visits.
- Trying advanced razor work with an inexperienced barber: Look at their portfolio first, and ask about their experience with designs.
Frequently Asked Questions
What is a high taper fade with design?
It is a high taper haircut with a razor-cut pattern shaved into the shorter hair on the sides. The taper creates the clean, gradual shortening, while the design adds a line, shape or freestyle detail. It can be subtle or bold, depending on the pattern you choose and how visible you want it.
How long does a razor fade design last?
A razor fade design usually stays sharp for a couple of weeks, though it varies. Hair growth speed, hair density and design complexity all play a part. Simple lines tend to last longer, while detailed patterns blur sooner. Your barber can give you a realistic estimate for your hair.
What design looks best with a high taper?
There is no single best design, but a clean razor line or a V-shape is a safe starting point. The best choice depends on your face shape, hair type and style. Simple lines suit most men, while geometric or freestyle patterns work for those wanting a bolder look.
Are razor-cut designs good for curly hair?
Yes, razor designs can look great with curly hair. The shaved sides create strong contrast with the curls on top. Curved lines and arcs often complement curly textures well. Because curls add volume, the design can look especially sharp when the top is kept neat.
Can a high taper design work with thin hair?
Yes, but simpler designs usually work better with thin or fine hair. Detailed patterns can lose definition when there is less hair density. A single line, an edge-up or a small accent tends to stay clear. Ask your barber what will hold up on your hair.
Where should a taper fade design be placed?
The temple and the side above the ear are the most popular spots because they are the easiest to see. Side-back placement behind the ear is more subtle, and the neckline suits small accents. Choose a location based on how visible you want the design to be.
How often should a razor design be redone?
Most men refresh razor designs every two to three weeks, though detailed patterns may need more frequent touch-ups. The right timing depends on hair growth and how sharp you like it. If you are happy with a softer look, you can wait longer between visits.
Is a high taper fade easy to maintain?
A plain high taper is fairly easy to maintain with regular barber visits. Adding a design increases upkeep, since the shaved lines need refreshing. Simple designs add little extra effort, while geometric or freestyle patterns require more frequent appointments to look their best.
Can I get a custom freestyle design?
Yes, many barbers offer custom freestyle designs. Share your ideas, reference photos and any meaning behind the pattern so the barber can plan it. Choose a barber with a strong portfolio of razor work, and book extra time because freestyle designs take longer to complete.
How do I explain a razor design to my barber?
Start by describing the taper height, then the design shape, size and location. Bring a clear reference photo and mention how long you want the top. Be specific about sharpness, too. If the barber suggests adjustments for your hair type or growth, discuss them before they start cutting.
Conclusion
High taper fade designs give you plenty of room to personalize a classic haircut. Whether you choose a single razor line, a sharp geometric pattern or a full freestyle panel, the best result comes from matching the design to your hair type, face shape and the time you want to spend on upkeep.
Start with the level of detail you are comfortable maintaining, bring a reference photo and explain the taper height clearly. With a skilled barber and a realistic refresh schedule, high taper fade designs can look sharp, modern and entirely your own.