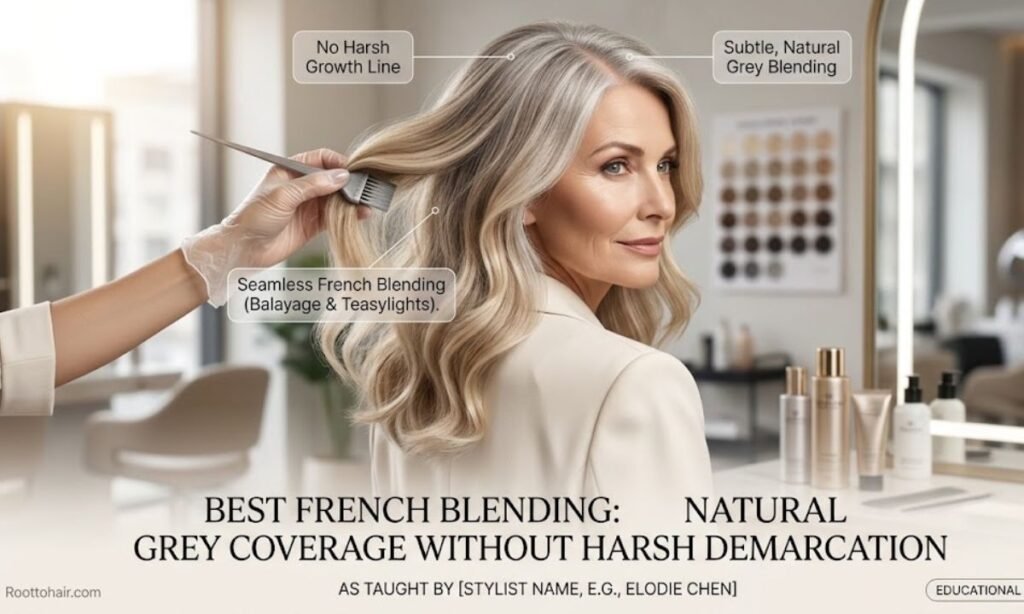
Full-coverage colour has one weakness: the regrowth line. Three weeks after a solid, opaque shade, the silver reappears at the parting and the client is back in the chair. French Blending takes a different approach. Instead of hiding every grey hair, it diffuses them with fine, soft strokes of colour so the transition from root to lengths looks natural and grows out gracefully.
This guide covers what French Blending is, how it compares with traditional coverage, which clients suit it, a worked formula, the application details that matter, and how to turn it into a retention service.
What is French Blending and why is it having its biggest moment?
French Blending is a grey coverage technique that softens and camouflages grey hair with fine, diffused strokes of colour, instead of covering it with one flat, opaque shade. The result is a root area that looks lived-in and dimensional, with no hard line when new growth appears.
It is having its biggest moment for a few reasons:
- Clients want low maintenance. Many are trying to stretch appointments from every 4 weeks to every 8–12.
- Natural-looking colour is in demand. Solid, “box-dye” coverage reads as dated; soft, multidimensional colour reads as expensive.
- Grey is no longer seen as something to hide at all costs. Clients want it blended, not erased.
- Salons need retention tools. A service that grows out well keeps the client booked in without the stress of a visible regrowth line.
How is it different from traditional grey coverage?
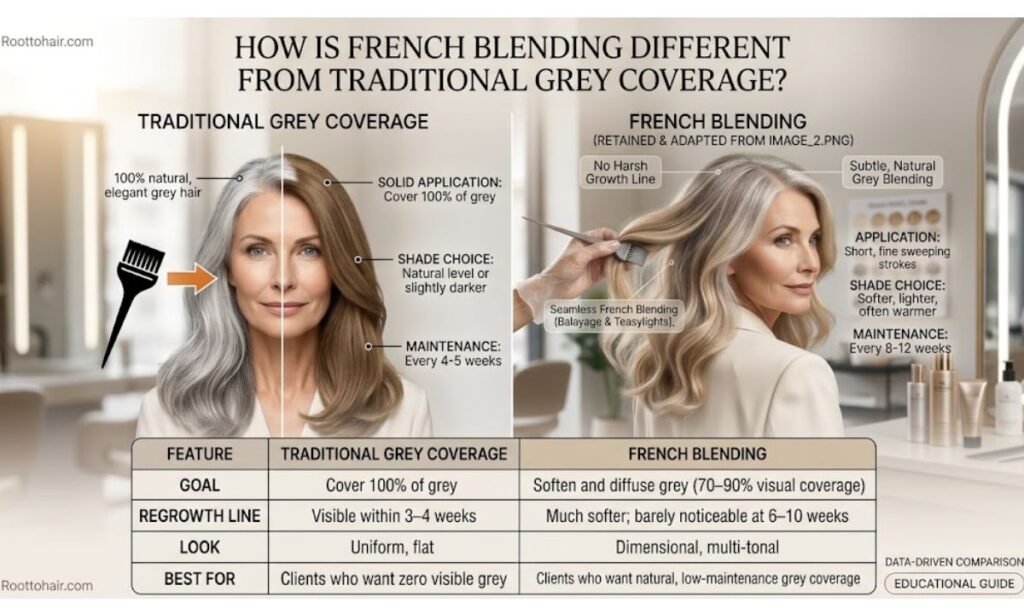
Traditional grey coverage applies one shade, usually at or close to the natural level, from root to the regrowth edge. It’s effective, but it creates a clear contrast between new growth and coloured hair. French Blending works the opposite way.
| Traditional grey coverage | French Blending | |
| Goal | Cover 100% of grey | Soften and diffuse grey (typically 70–90% visual coverage) |
| Application | Solid root application with a bowl and brush | Short, fine sweeping strokes with a flat brush |
| Shade choice | Natural level or slightly darker | Usually softer and lighter, often a warmer or more neutral tone |
| Regrowth line | Visible within 3–4 weeks | Much softer; often barely noticeable at 6–10 weeks |
| Maintenance | Every 4–5 weeks | Every 8–12 weeks (depending on grey percentage) |
| Look | Uniform, flat | Dimensional, multi-tonal |
| Best for | Clients who want zero visible grey | Clients who want natural, low-maintenance grey coverage |
What grey percentage needs French Blending (and when NOT to use it)?
French Blending works best on low to medium grey, where there is still enough pigmented hair for the grey to blend into. As the grey percentage rises, the technique needs to adapt.
| Grey percentage | Suitability | Recommended approach |
| Under 20% | Good, but often unnecessary | A gloss or very light blend is usually enough |
| 20–40% | Excellent | Classic French Blending with a soft, one-level-lighter shade |
| 40–60% | Very good | French Blending with a higher concentration of natural base in the mixture |
| 60–80% | Possible, with adjustments | Combine blending strokes with low-level lowlights or a denser application |
| 80–100% | Usually not ideal | Consider grey blending, or full coverage if that is the client’s goal |
When NOT to use French Blending
- The client wants 100% opaque coverage with no visible grey at all.
- The hair is 100% white and highly resistant, where soft strokes will not hold.
- The hair is very short, leaving too little length to create a gradient.
- The client has a history of box dye or dark permanent colour that creates a harsh line you cannot diffuse without a colour correction first.
- The client expects to skip appointments entirely. Blending extends the time between visits; it does not remove them.
French Blending formula step by step (real example)
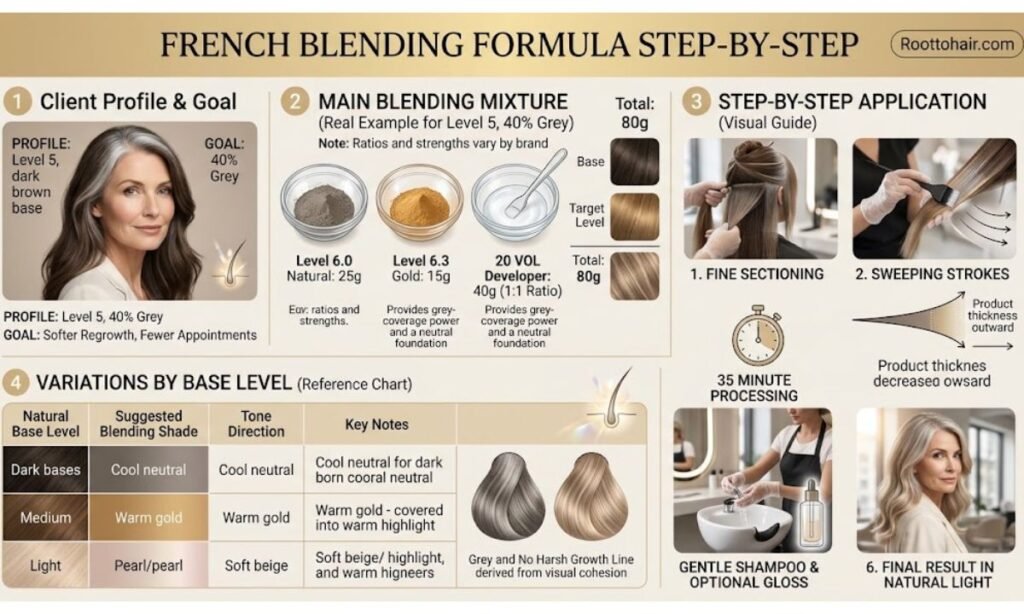
Note: The formula below is an example for a common scenario (natural level 5, around 40% grey). Mixing ratios, developer strengths and processing times vary by brand, so always follow the manufacturer’s instructions and do a strand test.
Client profile: Natural level 5, 40% grey, previously coloured with a solid level 5. Goal: softer regrowth and fewer appointments.
Main blending mixture
| Component | Amount | Purpose |
| Level 6.0 (natural) | 25 g | Provides grey-coverage power and a neutral foundation |
| Level 6.3 (gold) | 15 g | Warms the blend so grey reads as highlights, not stripes |
| 6% (20 vol) developer | 40 g (1:1) | Lifts slightly while depositing; follow your brand’s ratio |
| Total | 80 g |
Step by step:
- Section the hair into fine sections focused on the zones with the highest grey concentration (parting, temples, hairline).
- Apply the mixture with short, sweeping strokes from the root outward, keeping the product thinnest at the outer edge of each stroke.
- Process for about 35 minutes (or per manufacturer guidelines).
- Rinse thoroughly and shampoo gently with a sulphate-free formula.
- Optional gloss: apply a demi-permanent gloss at the shampoo bowl to even out tone and add shine.
- Style and check the result in natural light.
Variations by base level
The principle stays the same: choose a shade about one level lighter than the natural base and add warmth or neutrality to soften the contrast.
| Natural base level | Suggested blending shade | Tone direction | Notes |
| Level 3–4 (dark brown) | Level 4–5 | Neutral-natural with a touch of warm | Avoid going too light, or the blend will look patchy |
| Level 5–6 (medium brown) | Level 6–7 | Natural + gold or soft beige | The most forgiving range for beginners |
| Level 7–8 (light brown to dark blonde) | Level 8–9 | Natural beige or soft golden | Use a lower developer volume to keep lift minimal |
| Level 9–10 (light blonde) | Level 9–10 | Soft neutral or pearl | Grey can be difficult to see; often a gloss is enough |
How can I naturally cover grey hair?
“Natural” can mean two things: a natural-looking result or natural ingredients. Here are the best options for both.
Use Low-Level Lowlights and Highlights to Blend Grey Strands
Fine lowlights (one to two levels deeper than the natural base) placed through the grey areas break up the solid silver. Fine highlights can do the opposite on very light hair, so the grey becomes part of the dimension.
- Best for: 30–60% grey
- Maintenance: every 10–14 weeks
- Result: multi-tonal, with a soft growout
Try Semi-Permanent Gloss and Toner to Soften Grey Coverage
Semi-permanent glosses and toners do not lift or cover completely, but they tint grey strands and reduce the contrast with the rest of the hair. They are ideal for clients with under 30% grey or for between-appointment refreshes.
- Best for: under 30% grey
- Maintenance: every 4–6 weeks (they fade gradually)
- Result: shiny, translucent, low commitment
Choose Natural Dyes Like Henna and Herbal Rinses for Subtle Grey Cover

Plant-based options such as henna, indigo and herbal rinses (for example, black tea or sage) can tint grey hair. A few honest points before recommending them:
- Results are warm-toned and less predictable, especially on resistant grey.
- Henna can interfere with later chemical colour or lightening, so tell clients who may switch back to salon colour.
- Avoid products containing metallic salts, which can react badly with chemical services.
- Always do a patch and strand test.
| Option | Coverage | Longevity | Best for |
| Low-level lowlights/highlights | Camouflage | 10–14 weeks | Medium grey, low maintenance |
| Semi-permanent gloss/toner | Light tint | 4–6 weeks | Low grey, shine |
| Henna and herbal rinses | Subtle to medium | Weeks to months | Clients preferring plant-based options |
| French Blending | Soft, diffused coverage | 8–12 weeks | Natural look with minimal regrowth line |
What is the difference between French blending and grey blending?
The two terms are often confused. They share the goal of avoiding a harsh regrowth line, but they take opposite attitudes toward the grey itself.
How French Blending Uses Soft, Diffused Tones to Mask Grey
French Blending actively camouflages grey. Soft, warm or neutral strokes tint the silver so it blends into the surrounding colour. The result still looks like “coloured hair”, just with a gentler transition.
How Grey Blending Embraces Your Natural Silver Roots
Grey blending celebrates the silver. Instead of covering it, the colourist adds highlights and lowlights around the grey so it looks intentional, and often uses the technique to help clients transition to fully natural grey over several months.
French Blending vs Grey Blending: Maintenance, Cost and Results

| French Blending | Grey Blending | |
| Approach | Camouflage the grey | Embrace and enhance the grey |
| Typical technique | Fine strokes of soft deposit colour at the root | Highlights, lowlights and gloss around natural grey |
| Visible grey after service | Low to moderate | Moderate to high (by design) |
| Best for | Clients who want to look “naturally coloured” | Clients moving toward natural silver |
| Maintenance | Every 8–12 weeks | Every 10–16 weeks; may taper off over time |
| Cost | Moderate; shorter, more frequent root services | Higher per visit (more foils/time), fewer visits overall |
| End goal | Ongoing, low-line coverage | Eventually growing out all colour |
Is French blending the same as balayage?
No, but they can work together. Balayage is a technique for hand-painting lightener or colour onto the hair. French Blending is a grey-coverage approach focused on diffusing colour at the root.
Balayage vs French Blending: Hand-Painted Technique or Colour Result?
| Balayage | French Blending | |
| What it is | A free-hand painting technique | A grey-coverage method and colour result |
| Main purpose | Add lightness and dimension | Soften and camouflage grey, avoid regrowth line |
| Where applied | Mid-lengths to ends, sometimes through the root | Primarily the root and grey-dense zones |
| Uses lightener? | Usually | Rarely; mostly deposit colour |
| Grey coverage | Limited on its own | Primary goal |
Where French Blending and Balayage Overlap on Grey Hair
Both use hand-painted, sweeping applications and aim for soft, blended transitions. On clients with grey, many colourists combine them: balayage for dimension through the lengths, and French Blending at the root to diffuse the grey and create a seamless connection.
Which Is Better for Grey Coverage: Balayage or French Blending?
For grey coverage specifically, French Blending is the stronger choice because it is designed to tint and soften silver at the root. Balayage works best as a complement, adding movement and brightness that make grey less noticeable overall. For most grey-haired clients, the best result is a combination of both.
What is the healthiest way to cover grey hair naturally?
The healthiest approach is the one that minimises unnecessary chemical exposure while still delivering the coverage your client wants. French Blending already supports this, because the colour is applied only to the zones that need it rather than from root to ends every time.
Ammonia-Free and Plant-Based Colour Options for Healthier Grey Coverage
- Ammonia-free colours can be gentler on the hair and have a milder smell, but “ammonia-free” does not automatically mean allergy-free or damage-free.
- Plant-based colours reduce synthetic ingredients, though they may be less predictable and less long-lasting.
- Whichever route you take, check ingredients and note that some people react to PPD (para-phenylenediamine), which is common in permanent colours.
Protect Your Scalp and Hair Health While Covering Grey Strands
- Perform a patch test 48 hours before the first colour service.
- Avoid applying colour to an irritated or broken scalp.
- Keep colour off the scalp where possible by leaving a small gap at the root, a natural benefit of fine-stroke application.
- Do not re-apply colour over previously coloured lengths unnecessarily.
Nourishing Aftercare Habits That Keep Covered Grey Hair Strong and Shiny
Grey hair tends to be coarser and drier because it produces less natural oil, so aftercare matters:
- Use a sulphate-free, colour-safe shampoo.
- Apply a weekly deep-conditioning mask or bond-repair treatment.
- Use a heat protectant before blow-drying or styling.
- Add a gloss or glaze every 6–8 weeks to maintain shine and tone.
- Consider a UV-protecting product, because sun exposure can make coloured hair look brassy.
Application technique: the details that make the difference
The formula matters, but technique is what separates a seamless blend from a patchy one.
Tool: fine-tipped flat brush
Use a thin, flat brush with a fine tip. It lets you place colour precisely along the grey and feather the edges. A wide tinting brush deposits too much product and creates stripes.
The short sweeping stroke
Apply colour with short, light sweeping strokes from the root outward, easing pressure at the end of each stroke so the product fades out. Avoid long, heavy strokes, which leave a visible band.
Fine sections in the highest concentration zones
Work in fine sections where grey is densest: usually the hairline, temples and parting. Spending more time here gives the best visual payoff because these areas are most visible.
Don’t apply from mid-lengths to ends (unless needed)
Previously coloured lengths usually do not need more product. Keeping colour at the root prevents build-up, darkening and dryness. Only bring the colour through mid-lengths and ends if there is visible fade or a tonal correction to make, and then use a lower-strength formula.
Most common mistakes (and how to avoid them)
| Mistake | What happens | How to avoid it |
| Choosing a shade that is too dark | Grey looks like stripes against dark hair | Go about one level lighter than the natural base |
| Choosing a shade that is too cool or ashy | Grey looks dull or greenish | Add a touch of gold or warmth to the mixture |
| Using a heavy-handed application | Visible bands and hard lines | Use fine sections and light, feathered strokes |
| Applying to a client with 80%+ grey as standard | Poor coverage, client disappointment | Pre-screen grey percentage and adjust the technique |
| Overlapping colour onto previously coloured lengths | Dark, banded ends | Keep application at the root unless a refresh is needed |
| Skipping the strand test | Unpredictable result | Always test on a small section first |
| Promising “no maintenance” | Unrealistic client expectations | Explain it extends, not eliminates, appointments |
| Not consulting about at-home habits | Client uses box dye between visits and ruins the blend | Recommend a gloss or root-touch product instead |
How to pitch this service to a client who’s had full coverage for years?
Clients used to solid colour can be nervous about “less coverage”. The key is to sell the benefit, not the technique.
What to say:
- “I’d like to soften the line between your roots and lengths so you’re not rushing back every month.”
- “We’ll keep your colour, but let a little of your natural grey peek through in a way that looks intentional.”
- “This will grow out much more gracefully, so you can stretch your appointments.”
How to introduce it:
- Start with a consultation. Ask what bothers them most: the regrowth line, the upkeep, or the flat look.
- Show photos of French Blending, including growth at 4, 8 and 12 weeks.
- Set expectations. Be honest that some grey will show, and explain why that is part of the look.
- Offer a gradual transition. Move from solid coverage to blending over two to three visits.
- Book the next visit before they leave. Recommend a root refresh at 8–10 weeks.
Client retention: French Blending as a business strategy
French Blending is not just a technique; it is a retention tool. Clients who are happy with how their colour grows out are far less likely to experiment with at-home dye or move to another salon.
Why it works for retention:
- Fewer complaints. There is no sudden regrowth line to feel embarrassed about.
- A natural upgrade path. You can move clients from solid coverage to blending, then to grey blending if they want to go silver.
- A reason to rebook. A gloss or root refresh every 8–12 weeks fits neatly into a rebooking plan.
- Higher perceived value. A tailored, hand-painted service feels more premium than a standard root touch-up.
Suggested service rhythm:
| Week | Service | Purpose |
| 0 | French Blending application | Initial soft grey coverage |
| 6–8 | Gloss or toner refresh (optional) | Maintain tone and shine |
| 10–12 | French Blending root refresh | Re-diffuse new grey growth |
| Every 3–4 visits | Dimension service (lowlights or balayage) | Keep the overall look fresh |
Frequently asked questions
What is French Blending in hair colour?
French Blending is a grey-coverage technique that uses fine, sweeping strokes of soft colour at the root to diffuse grey hair and avoid a harsh regrowth line.
How long does French Blending last?
Most clients can go 8–12 weeks between appointments, depending on their grey percentage and how fast their hair grows.
Does French Blending cover 100% of grey?
No. It is designed to soften and camouflage grey rather than fully hide it. Expect roughly 70–90% visual coverage depending on the hair.
Can I do French Blending at home?
It is possible but difficult. The technique relies on precise placement, shade selection and feathered application, so a professional colourist will get a better and more even result.
Is French Blending Bad for Your Hair?
It is generally gentler than repeated full-root colour, because less product is applied and the lengths are left alone. As with any colour service, healthy aftercare is important.
Is French Blending suitable for dark hair?
Yes. On dark bases the shade is chosen about one level lighter and warmed slightly so the grey blends instead of standing out.
How is French Blending different from highlights?
Highlights lighten the hair with bleach. French Blending mainly deposits colour to soften grey, so there is typically no lightening involved.
How much does French Blending cost?
Pricing depends on your location, salon and hair length. It is often priced similarly to a root colour service, sometimes slightly higher because of the extra time and precision involved.
Conclusions
French Blending has become popular because it solves the most common problem with grey coverage: the harsh line between root and lengths. By using soft, diffused strokes and a slightly lighter, warmer shade, it gives clients a natural look that grows out gracefully and needs fewer appointments.
For colorists, it is a skill worth mastering. Choose the right clients (ideally 20–60% grey), use a fine brush and short sweeping strokes, keep colour off the lengths, and set honest expectations. Done well, French Blending delivers beautiful results, builds trust and keeps clients coming back.